The purpose of this module is to allow a discount to be made on fuel sales upon presentation of a voucher issued by a Supermarket or other organisation.
Setting up the module:
Back Office Set Up
- In your back office programme (Auto Shop or Financials) set up your Fuel Discount Products. We suggest that you create a separate Group & Category for this product, for reporting purposes. The screen shot below is an example of how this can be done:
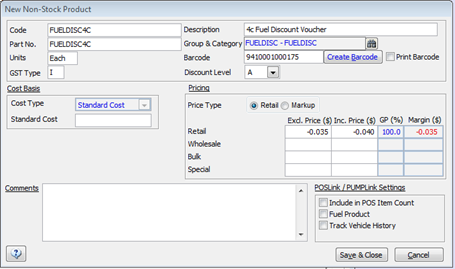
Please note the following:
- The price should be entered as a Negative value so that the amount calculated will be deducted from the invoice.
- Make sure the Barcode you enter is the one that will be used on the vouchers. You MUST enter a barcode for this product. As supermarkets often change their barcodes it may be worth generating your own and keeping a printed copy of the barcode near the till.
- The product should be ‘non-stock’ so that quantities do not show in the Product Setup screen, and the product will be excluded from Stock Takes and Stock Reports. It will still show up in POS daily reports, and in the Product Reports.
- You can set up a generic voucher product with a zero dollar value, then when processing this in POS just type in the price of the discount e.g. -.04 or -.35
POS Set Up
After having set up the product(s) in Back Office, Start PumpLink, click the Update Local Data button on the Main Menu, then click the ‘Setup’ icon.
Within the ‘Configure Lane’ tab, in the ‘Set Up Screens For’ section on the right, you will see a “Fuel Discount Voucher” button. Click this, and the following screen will appear:

The Product Code Field is a drop-down list – select the product you have set up for this purpose. Once selected, the barcode for that product should appear in the Barcode field. If not, enter or scan it in.
Enter the Maximum Litres that the discount will applied to (e.g. if you enter ‘50’ then the discount will be limited to the first 50L of fuel. As per the text within the brackets on this field, if you enter the number 0 (zero) there will be no volume limit applied to the discount and the full qty of fuel sold will have the discount applied to it.
Click the Save button. Continue to add new codes by clicking the Add button, which will become available once the first code has been entered and saved.
Some points to note about entering codes:
- There cannot be any duplicate codes or barcodes entered. The program will check for this when saving a new code, and stop this happening
- The codes and their Barcodes MUST have been set up in Back Office before they can be entered here.
- If a product code that has been entered here is discontinued in Back Office, you MUST click the “Update Local Data” button on the main PumpLink menu before attempting to do any sales. This will remove the discontinued code from the Fuel Discount Voucher System.
- If you change the barcode on a Fuel Discount Voucher product code, you MUST go back into the above screen and edit that product code’s barcode. If you do not, the system will not recognise the new barcode.
- You can delete codes from this screen if they become obsolete. This will not discontinue the product, and it will become available for general use. So the better way is to discontinue the code in Back Office.
- The option to limit the Maximum Litres for fuel discounts is only available in POS v10 Build 17.02 and above. Older versions of POS have no fuel discount volume limit and the discount will be applied to the total volume of fuel sold. In this scenario, if the sale has exceeds your volume limit you will need to edit the ‘Qty’ of the discount voucher manually.
POS – Processing a Discount Voucher Sale
Once a discount voucher has been set up, a new ‘Fuel Discounts’ button will appear in the POS sales screen

In the PumpLink Sales screen, on presentation of a voucher from a customer, add the sale from the pump in the normal manner, then press Fuel Discount button shown above. The following screen will appear:

Scan the barcode on the voucher and the discount will be calculated, based on all the total quantity of all the Fuel Sale lines in the sale, and will appear in the sales window as shown below:

Please note the following:
- Only one discount line is allowed per sale, but this will calculate the discount on all fuel sales entered BEFORE the discount line. If the Discount line has been added, then a further Fuel Sale Line, which qualifies for the discount, is added, you will need to delete the original Discount Line), and add it after all the Fuel Sale lines have been added.
- The program will stop you entering a product set up as a Fuel Discount product directly into the sale, even though it still shows in the selection list (F2). This is why it is critical to set up a specific product for the Fuel Discount.
- The “Scan the Barcode on the Voucher” window can also be opened using the keyboard shortcut {CTRL+F1}
Reporting
Reporting for the Fuel Discount Module is provided from within POS / PumpLink.
From the POS Main Menu – select ‘Reports Menu’ then Fuel Discount Voucher Report and you will be presented with the following Menu:

The ‘Detailed’ report shows the individual transactions, as below:

The ‘Summary’ report provides totals for each of the fuel discounts given, but not split into individual transactions:
