How to set up a customer-facing display (screen) with POS / PumpLink
TABLE OF CONTENTS
Disclaimer
This module is available only for the Synergy POSLink and PumpLink software packages and requires a Support & Maintenance Plan to be in place. Monthly software rental fee applies, and additional charges for setup and configuration may apply if you require assistance from our team to set the module up.
If you are adding your own custom images to the display please refer to the details below regarding recommended image sizing.
Minimum System Requirements
You must be running at least Synergy Build 375 & POS Build 17.09 or greater to be able to operate the POS Customer Display module.
Additionally, we recommend the POS Customer Display be run on a monitor with a resolution of 1280 x 1024 for optimum results and clarity. The POS Customer Display application is designed to be run on a second monitor attached to the same PC running Synergy POSLink or PumpLink.
Module Introduction and Purpose
The POS Customer Display module has been designed to run on a second monitor that faces your customer. It will display the products as they’re added to the current sale and the current total amount ($) as products are added.
It is run by a separate application (.exe) file and features customisable background image, header (logo) section and a footer section where you can set up multiple images that change every few seconds (with a user defined duration of how long images are displayed before changing to the next image); this is for the purposes of showing current promotions / deals and advertising etc.
Setup and Activation
Activation
Once you have ordered the POS Customer Display module, and the order has been processed, you will be provided an activation code to enter into your program to activate this module. Follow these steps to input the activation code:
- Open Synergy
- Click ‘File’ in the top left corner
- Select ‘Activate Custom Modules’
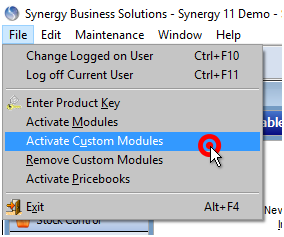
- Enter the Activation Code you have been provided then click ‘Active’
- Close and Restart Synergy
Download & Install the Application
This installation should be undertaken on any POS PC’s you wish to have a customer display connected to.
Click the link below to download the installer for the POS Customer Display application:
www.synergy.net.nz/downloads/files/POS_CustDisplay_Installer.exe
Once the download is complete, run the installer and follow the onscreen prompts to complete the installation.
When the installer is complete, if you already had POS / PumpLink running, please close and restart it.
IMPORTANT NOTE: It is important that during the installation procedure, you install this program into the same directory your Synergy POS program is currently installed in (usually this is “C:\POS”), you can check your POS installation by checking the properties of your POS desktop shortcut.
You may also wish to have your IT service provider add the shortcut for the customer display to your Windows Start Up folder so it starts automatically every time your computer is restarted.
Setting up the Module
Before you can use the Customer Display module, you must first set it up. Setup is completed from within the POS program, and must be completed on each POS lane if you run POS on more than one computer.
- Open your POSLink or PumpLink program
- Select ‘Setup’ from the Main Menu
- Tick the ‘Do you have a customer display’ box then click the ‘Customer Display’ icon:

- On the next screen click the ‘monitor’ icon:

- You will now see the customer display setup menu shown below:

Within this screen the majority of the setup is to select the images that will be shown on the customer display. See the example in the ‘Customer Display Example’ section of this document.
Depending on your screen size and resolution, you may wish to trial various sized images for each section to find the best results. We cannot edit or create images for you, or attempt multiple image sizes on your behalf. We recommend you stick with our recommended images sizes noted below or through your own trial and error you can test different sized images.
Our recommended image sizing
On a 1280(W) x 1024(H) resolution we have found header images of 660(W) x 100(H) to be a good fit & footer advertising images of 660(W) x 300(H) to also be a good fit.
You may wish to consult a designer if you require customised images for your display.
- Reset Position – This button should only be used if you need to reset the on-screen place the customer display will open by default, useful if you change monitors or adjust the resolution of your monitors
- Select Wallpaper – This option allows you to choose the image file you will use as the background wallpaper of the customer display program
- Select Top Picture – This allows you to choose the image that will be used for the top / header section of the customer display, usually this will feature your company logo
- Select Ad. Pictures – Use this option to add your various advertising images that will be displayed in the footer (bottom) section of the customer display screen; images added here will be listed in the bottom left section of this setup form
- Delete Ad.Pictures – Use this option to remove selected ad images, so they’re no longer displayed. Click to select an image in the list and click this button to remove it.
- Change Ad Pictures every – Type into the box provided the number of seconds you want each ad picture to be displayed before it changes to the next image
Click the exit icon (image of door with green arrow) when you’re done and remember to click the ‘Save’ icon in the POS Setup screen before exiting to the POS main menu.
Operating the Module
The general operation of the module is straightforward, simply run the desktop shortcut for “POS Customer Display” and the program will open.
The first time you run the customer display program move the window to your second monitor connected to your POS PC and click the ‘maximise’ button on screen – this will set the dimensions and on-screen coordinates, so the program remembers to open in this location next time it is run.
From this point when you run your POS program, the details of the current transaction will be shown on the customer display as they’re scanned in.
If ever you need to change the size / location the customer display program opens in, simply close the customer display program using the ‘Exit’ button displayed and use the ‘Reset Position’ option shown in the setup section of this document.
Customer Display Example / Screenshot
Please find below an example image of the POS Customer Display screen, a full screen high quality version of this image can be downloaded using the following link:
www.synergy.net.nz/images/png/CustomerDisplayExample.png
