Outline the process of Using the CipherLab 8001 barcode stocktaking device with Synergy
TABLE OF CONTENTS
- Installation
- Configuration of the CipherLab Software
- Setting up Barcode Stocktaking in Synergy
- Stocktaking with the Device
Installation
You must install the USB to UART software before connecting the scanner to your PC, this software is available from the Silicon website (https://www.silabs.com/products/development-tools/software/usb-to-uart-bridge-vcp-drivers) alternatively it can be supplied by the Synergy Service Desk (09 583 2455 or support@synergy.net.nz ).
- Plug in the CipherLab 8000 and wait for the driver to load
- On the PC check the Device Manager or Devices and Printers for the com port (# 7 in this case) and Baud rate:

Right-click and go to:
1. Properties,
2. Then choose the Hardware tab
3. Click on Properties (bottom right)
4. Choose the Port Settings tab
The baud rate can be either 9600, 19200, 38400, 57600 OR 115200, it is suggested that 115200 is used as it is faster – make a note of which is used
Right-click and go Properties and then choose the Port Settings tab


Check the baud rate on the CipherLab 8000 Unit and make sure it is the same as what has been entered in point 3
On the unit go to 3. Utilities > 1. Settings > 3. Baud Rate
S:\Software\Others\CipherLab
You can now plug the devices docking station into power and your computer’s USB port.
Configuration of the CipherLab Software
Run the manufacturers “Data_Read” software which should be provided by Synergy
This will open the window shown below:
Complete one transfer & confirm it works. Do another transfer & THEN un-tick “Always show this dialog box.”
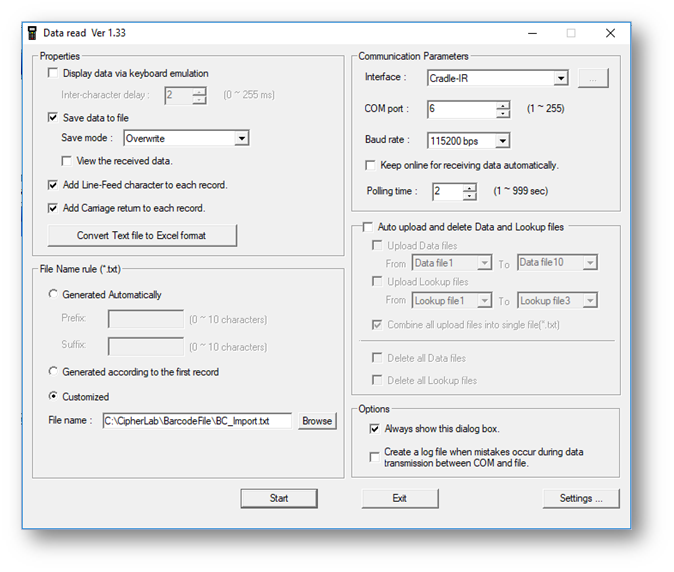
- Make sure that you Download Via: Cradle-IR
- Make sure the Baud rate is correct
- Once you have checked the settings work UNTICK this check box
- Press OK
- Save data to file is set to Overwrite
- Make sure the COM port is correct
File Name rule is Customised
Browse to the file created and used in the above field in the Import File Name field
Note – The file name above: C:\CipherLab\BarcodeFile\BC_Import.txt
Synergy expects the following format: BARCODE,COUNT:

Setting up Barcode Stocktaking in Synergy
- Open your Synergy Financials or Auto Shop program.
- Go to ‘Company/Setup’ and select the ‘Stock Control’ tab.
- Double click ‘Configure Module’ then select the ‘Bar Code Stock Taking’ tab
- You will see the menu shown below:
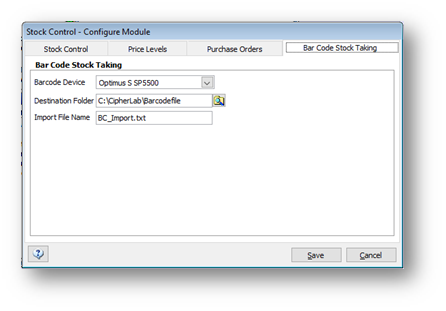
- Click the ‘Barcode Device’ dropdown menu and select ‘Optimus S SP5500’
- If you cannot find this option, you’re likely not running a recent enough Synergy update, so you may need to run the Synergy ‘Check for Updates’ routine to install the latest update.
- Type in or select the Destination Folder, this is the ‘File Name’ set up in Data_Read above
- Enter the ‘Import File Name’ which is the file name entered into Data_Read above.
Note – The Destination Folder and Import File Name settings must match the Directory and Filename set up in Data_Read
Stocktaking with the Device
Clearing Previous Stocktake Results
Before each new stocktake, you should ensure all previous stock-take data has been cleared from the device. Follow these steps to do this:
- Press ‘3’ on the main menu of the device to select ‘Utilities’
- Press ‘3’ again to select ‘Clear Records’
- Press ‘1’ to select ‘Clear All’
- Press ‘1’ to confirm
If there is no old stocktake data on the device, when selecting the ‘Clear Records’ option above, the device will simply beep and not continue to the following menu so you can simply press escape to go back to the main menu.
Starting the Stocktake Routine
- Press ‘1’ on the main menu to ‘Run Program’
- Hold the yellow button down and scan the barcode of your product
- Enter the quantity using the numeric keys and pressing the ‘Enter’ button (the button to the right of the large orange button).
- Continue this process until you have completed counting the products you wish to stocktake
- When you have finished counting, press the ‘ESC’ button to go back to the devices main menu
Uploading the Results from the Device to your Computer
- Press ‘2’ to select ‘Send Data’
- Insert the device into its ‘docking station’.
- Run the ‘Optimizer’ software and press F8 on your keyboard to load the ‘Receive Data menu’
- Press OK on the Receive Data Menu and the data will now be transferred to your Computer.
Loading the Results into Synergy
- Open Synergy the ‘Stock Control’ module
- Select ‘Stock Taking’
- Press the ‘Import Barcode File’ button shown bottom left in the image below:

- If the import file contains barcodes which have not previously been entered against a product in your Synergy database, these barcodes will be displayed on screen.

- The results of the stocktake will now be loaded into the screen shown above where you can now run your ‘Adjusted Stock Report’.
- The import will be the sum total of ALL scans for each product
- Scan a product twice and it will enter the total of both scans
- To confirm and finalise the results and update your databases stock quantities click the ‘Update’ button.
If you have difficulty or require assistance with any of the above, please contact the Synergy helpdesk on 09 583 2455