Simplify your bank reconciliation process with imported bank statements. This also provides a simpler interface for inputting debtor receipts as it will create them in both Accounts Receivable and Cashbook simultaneously.
Please note – this feature is only available to clients on a Support & Maintenance Plan. If this is you, email info@synergy.net.nz to request your activation code

Once you have your activation code, please follow the steps below to set this up
TABLE OF CONTENTS
- Confirm the Payment Type for Direct Credits:
- Setup the Import File for your Bank Account(s)
- Importing the Bank Statement
- TIPS & TRICKS
Confirm the Payment Type for Direct Credits:
Company/Setup -> Accounts Receivable -> Configure Module -> Receipts – Select the Payment Type used for Direct Credits (if you do not have one, you will need to add a new payment type).
Setup the Import File for your Bank Account(s)

Refer to an exported statement / transaction list from your bank to setup the details below.
Note: Comment and Reference will be copied into the transaction(s) created

Field Numbers – Counting from left to right in the file from your bank, setup the appropriate field numbers to correspond with Date, Transaction Type (sometimes called ‘description’) etc.
Skip Lines defines how many rows, in the file from your bank, to skip during the import. The first row should be column headings/labels so this is skipped automatically and isn’t included in the count for the number of rows to skip.
Eg. If the file from your bank has column labels in the first row and all the transactions start from the following row – you should enter ‘0’ in the ‘skip lines’ field above (as the labels are skipped automatically). NB: Some banks do not provide column labels/headers in their exported CSV files, in this instance you must add a row to your CSV manually before importing, or a row of data will be missed.
If the transactions start on the fifth row, enter ‘3’ in the ‘skip lines’ field (the first row is skipped automatically – then it skips the next 3 lines starting the import in the fifth row).
Date Format Check the file you are importing and ensure the date format matches, if the date in the file is similar to 29/11/12 chose dd/mm/yy, if the date is 29/11/2012 chose dd/mm/yyyy (note the year has 4 numbers). An incorrect setting will cause your program to crash when you import the file.
An example of an exported statement is below which has been used to setup the details from above. Cheque number column and the Unique ID have been excluded in this example, but you can assign these as you wish.
Once completed, click ‘Save’ and you are ready to import a bank statement for this account.
Importing the Bank Statement
Cashbook -> Transactions Lists -> Cashbook Statement Import
Loading a New File from the bank – You will need to have downloaded from the bank a copy of the file you intend to import and click ‘Load’. If the file has already been started then then click ‘Edit’.

.
NOTE: Once all transactions have been assigned the system will tick the Finalized box
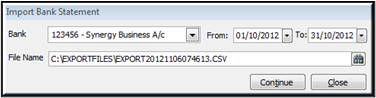
Bank: Select the bank account for the import.
From and To: Used to control what within the file is being imported.
File Name: The name of the file being imported.
Click Continue
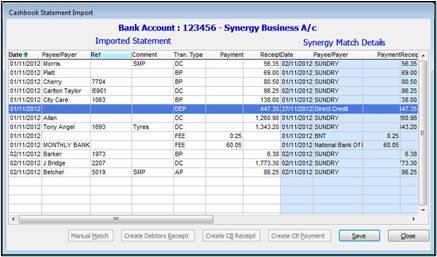
The screen now showing will include all the bank statement details from the import. You can now Manual Match, create a Debtors Receipt or a Cashbook Receipt or Cashbook Payment relating to every transaction on this list. Use the Buttons below as appropriate.
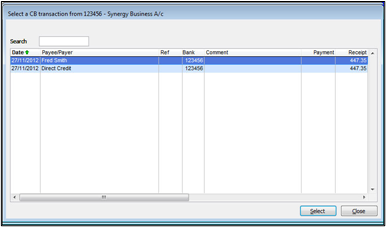
Manual Match
this will automatically bring up a list of cashbook transactions with the same amount that have not been cleared. You can then select which one to match it to.
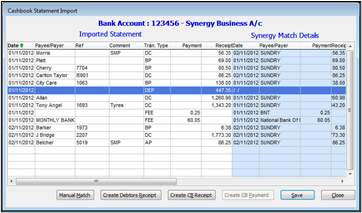
Remember to ‘Save’ before closing. You do not have to complete all the work in one go, you will be able to edit this import until it is completed.
When you have finished with the import and click ‘Save’, you are taken directly to the bank reconciliation in Synergy. All transactions that have been created in the Import process will be automatically ticked.

The system will take you to the Bank Reconciliation screen you would expect if you were manually creating bank reconciliations.
If everything is completed then finalise as normal. The Bank Import will now show this file as finalised.
 |  |
| Finalise or Save this bank rec. | Click Close |
On this screen you can view the details of previously finalised Statement Imports or edit un-finalised imports.

Note – there is a limitation within this development, that if the final record in the data imported has only numbers in the reference, comment or payee fields the data for this record may display oddly
TIPS & TRICKS
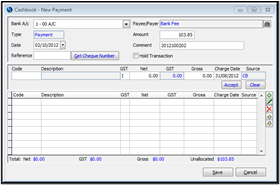
Cashbook Entries
To use any allocations setup for a payee please click into the amount column and tab out of it. We haven’t been able to auto-magically make this bit work but the standard system will behave if you tab from this field. This applies to both payments and receipts.

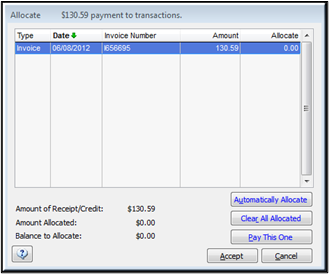
Customer Receipt –
we have added a few additional features to the Receipt payment to allow you to choose to Pay This One or sort in order of Dates in the selection screen.
Bank Reconciliations
Make sure you have finalised all your old bank reconciliations, this process is expecting to have only the one bank rec open.
If you accidentally abandon your bank statement and your Import is finalized then you must delete the import and load again. This will match everything and then let you create the bank reconciliation again when you save.

NOTE: The Name will revert back to the default if you attempt to transfer several payment types with different cashbook names in the one transfer
In this release you will need to fix up any mistakes manually either in the cashbook directly or in AR for a Customer Payment.
Payment Types
We have changed these to allow you to default in the name of the Payment type when you are doing banking. Now when you transfer banking you will not have to remember to change the name.