
Overview
The purpose of this module is to allow fuel discounts to be applied to fuel sales upon presentation of a voucher issued by a supermarket or other organisation.
1. Back Office Setup
In your back-office program (Auto Shop or Financials), set up your Fuel Discount Products.
Steps to Create a Fuel Discount Product
- Go to Account Receivable
- Click on Product
- Click New to insert a product
- Ensure the product type is set as Non-Stocked Product
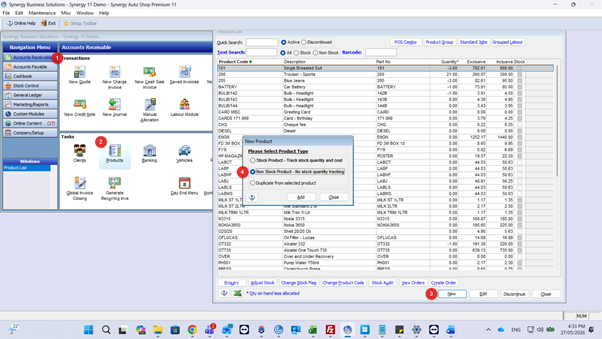
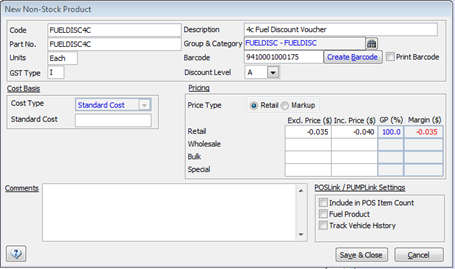
It is recommended to create a separate Group and Category for fuel discount products for reporting purposes.
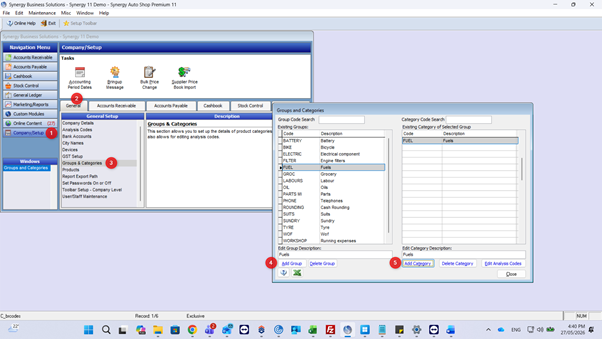
Steps to Create a Group & Category
- Go to Company/Setup
- Select the General tab
- Open Group & Categories
- Add a new Group
- Add a new Category
Important Notes
- The price must be entered as a negative value, so the discount amount is deducted from the invoice.
- Ensure the barcode entered matches the barcode used on the vouchers.
- A barcode must be entered for this product.
- As supermarkets may change their barcode formats, it is recommended to generate your own barcode and keep a printed copy near the till.
- The product should be configured as a Non-Stock item so quantities do not appear in Product Setup, Stock Takes, or Stock Reports.
- The product will still appear in POS Daily Reports and Product Reports.
- A generic voucher product with a zero-dollar value can also be created. When processing the sale in POS, manually enter the discount value (e.g. -0.04 or -0.35).
2. POS Setup
After setting up the product(s) in Back Office:
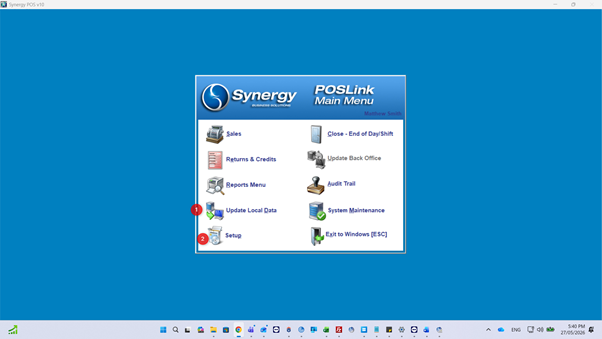
- Start PumpLink/POSLink
- Click Update Local Data from the Main Menu
- Click the Setup icon
Within the 1. Configure Lane tab:
2. Locate the Set Up Screens For section
3. Click the Fuel Discount Voucher button
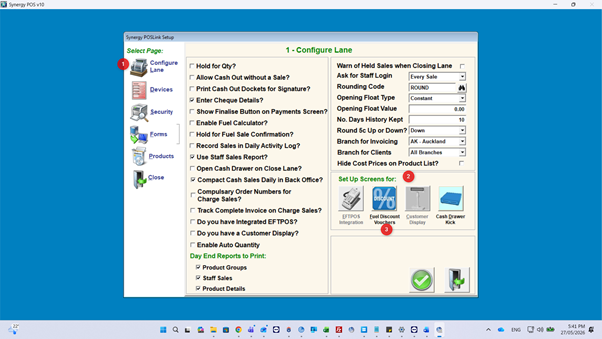
The Fuel Discount Voucher setup screen will appear.
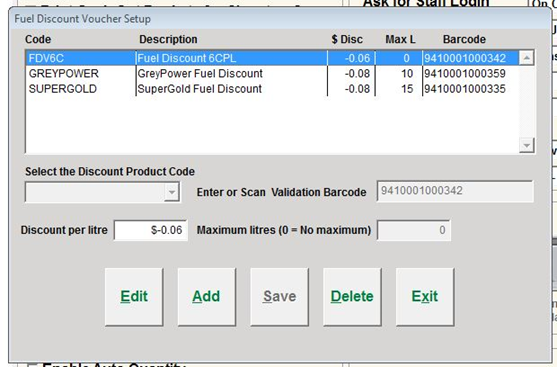
Configuring Fuel Discount Voucher Codes
- The Product Code field is a greyed-out drop-down list.
- Click Add to enable the drop-down selection.
- Select the fuel discount product created in Back Office.
- Once selected, the barcode should automatically populate.
- If the barcode does not appear, manually enter or scan it.
Maximum Litres Setting
Enter the maximum litres the discount can apply to.
Example:
- Entering 50 limits the discount to the first 50 litres of fuel.
- Entering 0 applies the discount to the entire fuel quantity sold.
Click Save once completed.
To add additional voucher codes:
- Click Add
- Enter the new details
- Save the record
Important POS Setup Notes
- Duplicate product codes or barcodes are not allowed.
- Product codes and barcodes must first be created in Back Office before being configured in POS.
- If a product is discontinued in Back Office, you must click Update Local Data before processing sales.
- If a barcode changes, you must manually update the barcode in the Fuel Discount Voucher setup screen.
- Obsolete codes can be deleted from the setup screen; however, discontinuing the product in Back Office is the recommended method.
- The Maximum Litres limitation feature is only available in POS v10 Build 17.02 and later.
- Older POS versions apply the discount to the total fuel quantity sold. In these cases, the discount quantity must be manually adjusted if volume limits apply.
3. POS – Processing a Discount Voucher Sale
Once a fuel discount voucher has been configured, a new Fuel Discounts button will appear in the POS sales screen.
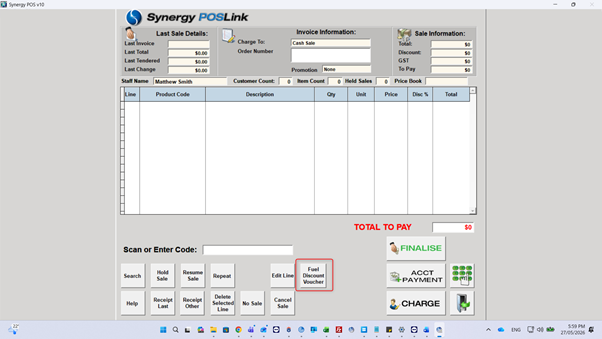
Processing a Fuel Discount
- Add the fuel sale from the pump as normal.
- Click the Fuel Discount button.
- The voucher scan window will appear.
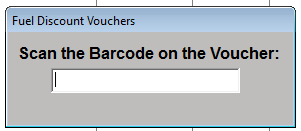
- Scan the voucher barcode.
The system will:
- Calculate the discount based on the total quantity of fuel sale lines entered
- Apply the discount automatically to the sale

Important Processing Notes
- Only one discount line is allowed per sale.
- The discount applies only to fuel sale lines entered before the discount line.
- If additional fuel items are added after the discount line, the original discount line must be deleted and re-added.
- Fuel Discount products cannot be entered directly into the sale, even though they remain visible in the product selection list (F2).
- This is why it is important to create dedicated Fuel Discount products.
- The voucher scan window can also be opened using the keyboard shortcut:
CTRL + F1
4. Reporting
Fuel Discount reporting is available within POS / PumpLink.
Accessing Reports
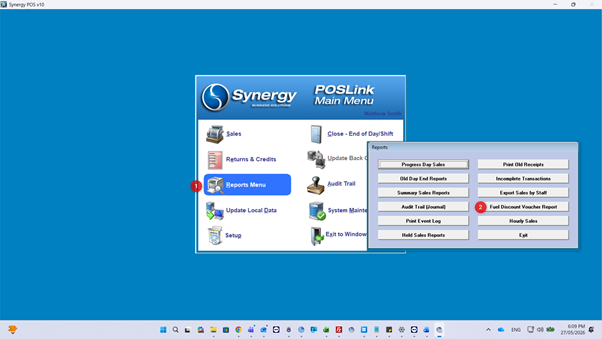
- From the POS Main Menu, select Reports Menu
- Select Fuel Discount Voucher Report
Report Types
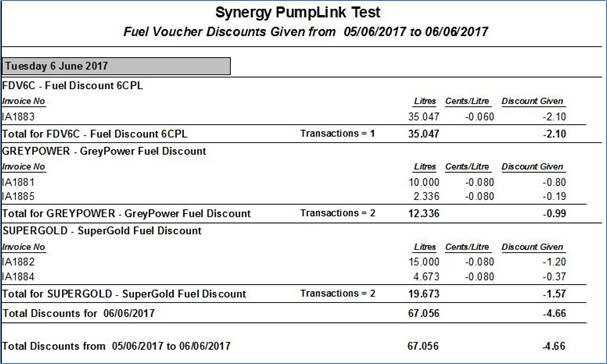
Detailed Report
Displays:
- Individual transactions
- Discount details per transaction
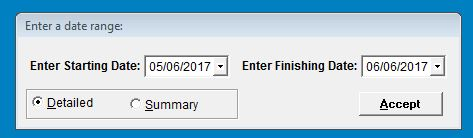
Summary Report
Displays:
- Total fuel discounts issued
- Summary totals only
- No individual transaction breakdowns